If you found your way here, I'm guessing you're an inspiring DIY'er when it comes to your blog's design. Sure, you could browse around Etsy looking for a custom header design, or hire a graphic designer to make one for you, but if you really want your blog to show off
your personality, making your own is THE way to go.
Creating your own header doesn't have to be scary or over-complicated. Keep reading and I'll show you how you can make your own header with PicMonkey - a simple and easy to use (did I mention, free?!) online photo editor.
PicMonkey is one of my favorite online image editing sites because they offer so much in the way of designing and creating pictures that really stand out.
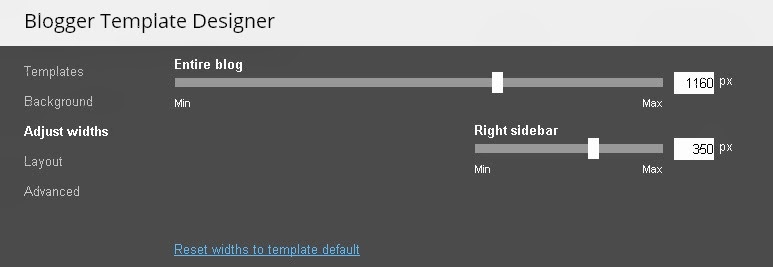
First things first - You will need to know the size of your blog. If you use Blogger, finding your blog width is as simple as going to your dashboard, clicking "Template", going to "Customize", and then looking under "Adjust Widths."
Dashboard>Template>Customize>Adjust Widths
As you can see, my entire blog is 1160px. Write your width down; this number is important since you'll use it in the next step.
Size Your Header
After going to
PicMonkey.com, click on "Design." This will bring up a menu with several different options such as a Square, Facebook Cover, 4x6, etc. You will want to click on "Custom" and adjust the size to whatever size you want your header to be. I am going to enter in 1160 px for the width and 500 px for the height. This gives me a bigger canvas to work with than my actual header size.
Name your blog
If you click on the Tt symbol on the left-hand side of PicMonkey, it will bring up a list of fonts to choose from. Pick one that fits your personality, or your blog's style. For this tutorial, I used one of my own fonts and a premium font (must be a subscriber and pay the monthly fee for these- but if you use PicMonkey as much as I do it is definitely worth it in my opinion) but there are plenty of other great options that are free.
Choose the size and colors you want your text to be, and you can drag it to where ever you like it to be on the canvas. Remember not to fill the canvas completely, since we'll be cropping later.
Play around with several options and find what works the best. When you have your text the way you like, you can move on to the next step.
(Optional) Add an Overlay
The little butterfly button in the side menu is for overlays. You can choose to use one of PicMonkey's stock overlays, or you can upload your own. I decided to use the 'Cutimals' little hippos here.
Once you add the overlay, you can move it to where you want it to go. To place it behind your text, simply right-click your mouse and select "Send to back." You can select the color you want from the color menu, and use the slider to fade the overlay. That is what I did here:
Remove Background
Maybe this is just a personal preference, but when a blog has a colored background, I can't stand seeing a chunky header with a different color block standing out. To remove the background from your header image, just go back to the edit menu and click 'Canvas Color' then check the box that says 'Transparent canvas' and click 'Apply'.
Crop and Save
Here's the part where knowing the length of your entire blog comes in handy. If you want your header to stretch across the entire width of your blog, only crop it for height. If you have a lot of blank space, however, you'll want to get rid of that to keep the image file size a little smaller.
Just go back into the edit menu and click crop, then move the box where you want to clip your header.
Now, just click 'Save' at the top, and name your header. Just be sure to choose a .png extension if you used a transparent background.
Bonus: Reduce Size Before Uploading
By now I'm sure you've realized that larger file sizes take longer to load on your blog. That's a total "eek!" when it comes to your header. If you want to reduce the size of the file, without compromising the quality of the image, I suggest using a compressor like
TinyPNG (free and totally online) before uploading it to the blog.
As you can see, it's able to compress those image files drastically.
So there you have it, How to Design a Blog Header with PicMonkey.
If you're interested in having a custom blogger design - check out
Clueless Momma Designs
Comment below and let me know what blog design project you're working on. I'd love to help make it easier!